Using FAST on MRI and CT images in Python
Contents
- MRI and CT images
- Open and display a CT/MRI image
- Display segmentation on top of CT/MRI image
- Display a specific orthogonal slice of a CT/MRI volume
- Extract CT/MRI image to a numpy array
- Volume rendering of a CT/MRI image
- Surface extraction of a CT image
- Slice-wise processing
- Patch/slab-wise processing
- Volumetric resizing and resampling
- Brain segmentation of MRI using a neural network
- Skull stripping of MRI brain using a neural network
- Changing pipeline parameters using a simple GUI
- Next steps
This is a tutorial for processing and visualizing MRI and CT images with FAST in python.
MRI and CT images
MRI and CT data are typically stored as volumes and can be stored in many different formats. FAST currently supports reading MRI and CT data stored as DICOM (.dcm), NIFTII (.nii/.nii.gz, popular in neuroimaging) and metaimage (.mhd/.raw/.zraw) format.
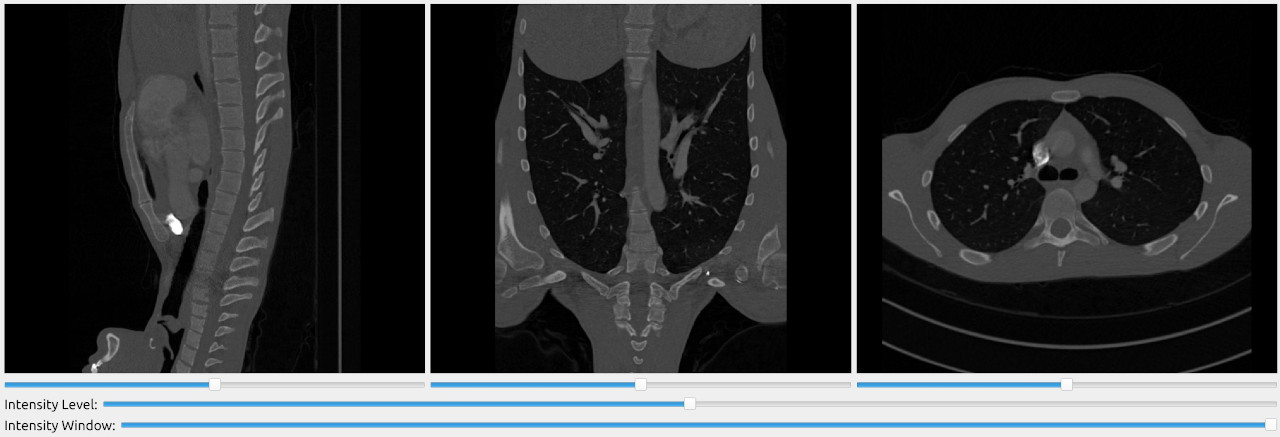
Open and display a CT/MRI image
Use the ImageFileImporter to read the images. This importer supports images of many formats. The SlicerWindow is convenient for visualizing 3D data as it displays 3 orthogonal slices of a volume.
import fast

importer = fast.ImageFileImporter\
    .create(fast.Config.getTestDataPath() + "/CT/CT-Thorax.mhd")

fast.SlicerWindow.create()\
    .connectImage(importer)\
    .run()
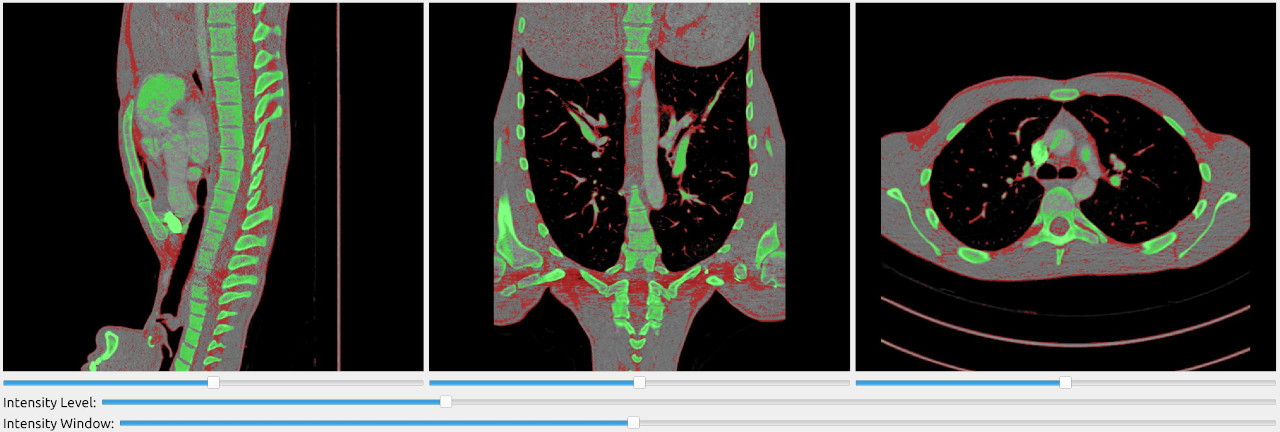
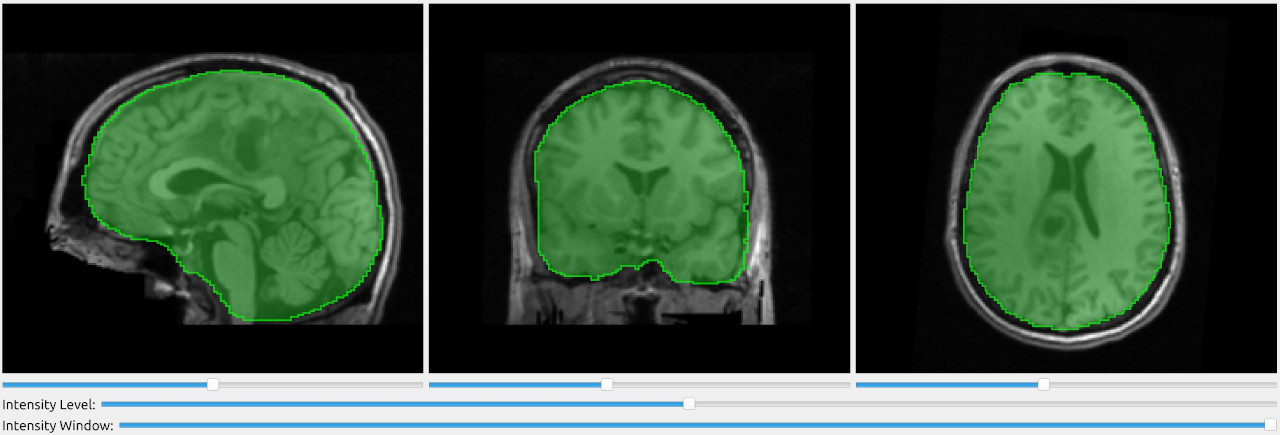
Display segmentation on top of CT/MRI image
The SlicerWindow can also be used to overlay segmentations on top of the MRI/CT image.
import fast

importer = fast.ImageFileImporter\
    .create(fast.Config.getTestDataPath() + "/CT/CT-Thorax.mhd")

segmentation = fast.BinaryThresholding.create(300)\
    .connect(importer)

segmentation2 = fast.BinaryThresholding.create(-512, 0)\
    .connect(importer)

fast.SlicerWindow.create()\
    .connectImage(importer)\
    .connectSegmentation(segmentation)\
    .connectSegmentation(segmentation2)\
    .run()
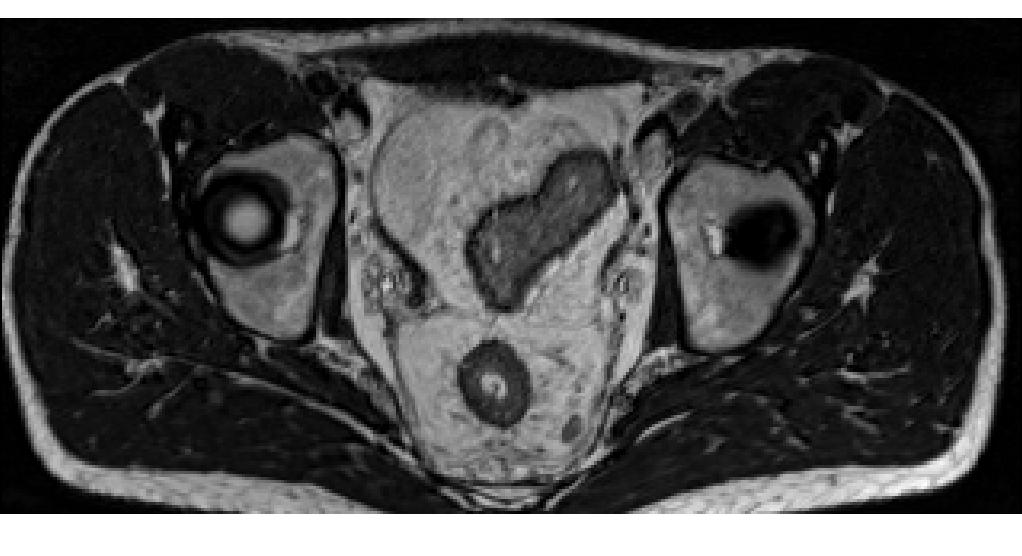
Display a specific orthogonal slice of a CT/MRI volume
Here we use the SliceRenderer to extract and display the 128th slice in the Y plane of an MRI volume:
import fast

importer = fast.ImageFileImporter\
    .create(fast.Config.getTestDataPath() + "/MRI/MR-Abdomen.mhd")

renderer = fast.SliceRenderer.create(fast.PLANE_Y, 128)\
    .connect(importer)

fast.SimpleWindow2D.create()\
    .connect(renderer)\
    .run()
Extract CT/MRI image to a numpy array
To get data from a processing chain simply call the ProcessObject::
import fast
import numpy as np

importer = fast.ImageFileImporter\
    .create(fast.Config.getTestDataPath() + "/MRI/MR-Abdomen.mhd")

data = np.asarray(importer.runAndGetOutputData())
print(data.shape, data.dtype, np.min(data), np.max(data))
# The print should return: (160, 320, 320, 1) uint16 0 1024
Volume rendering of a CT/MRI image
FAST has several different volume renderers available to render 3D data. These volume renderers perform ray casting using OpenCL, and displays the resulting image using OpenGL.
Alpha blending volume renderer
import fast

importer = fast.ImageFileImporter\
    .create(fast.Config.getTestDataPath() + "/CT/CT-Thorax.mhd")

renderer = fast.AlphaBlendingVolumeRenderer.create()\
            .connect(importer)

fast.SimpleWindow3D.create()\
    .connect(renderer)\
    .run()
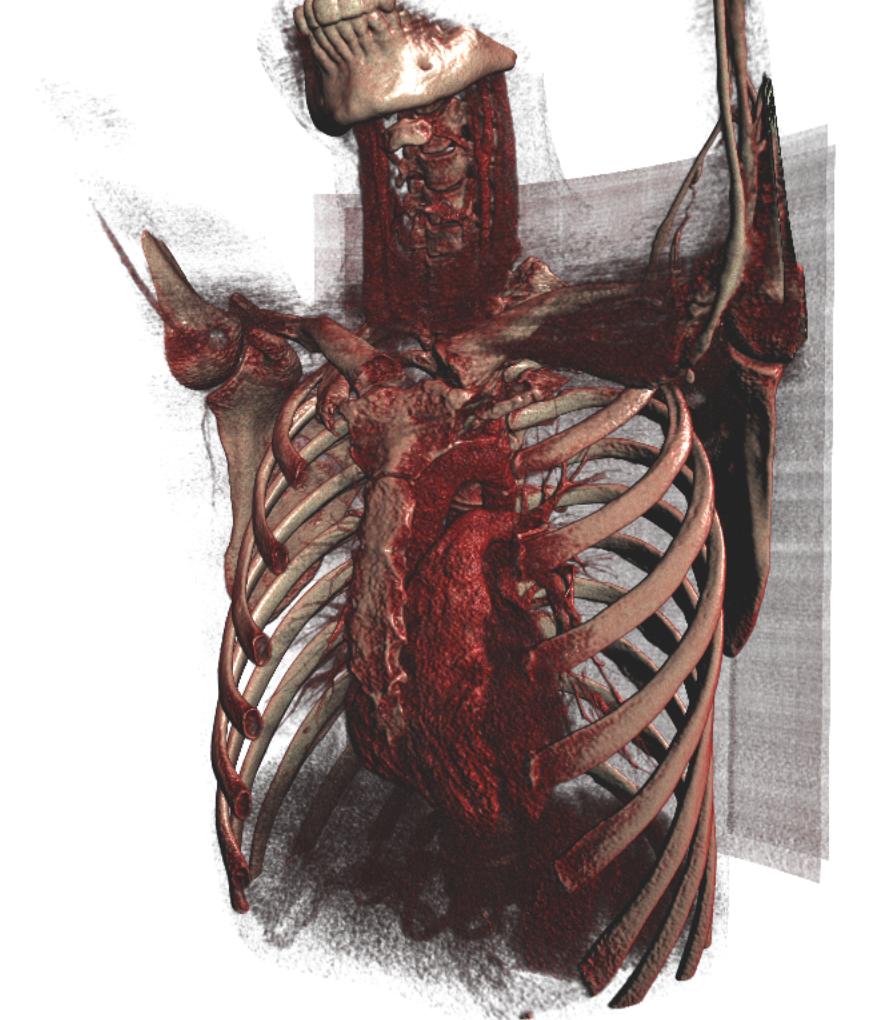
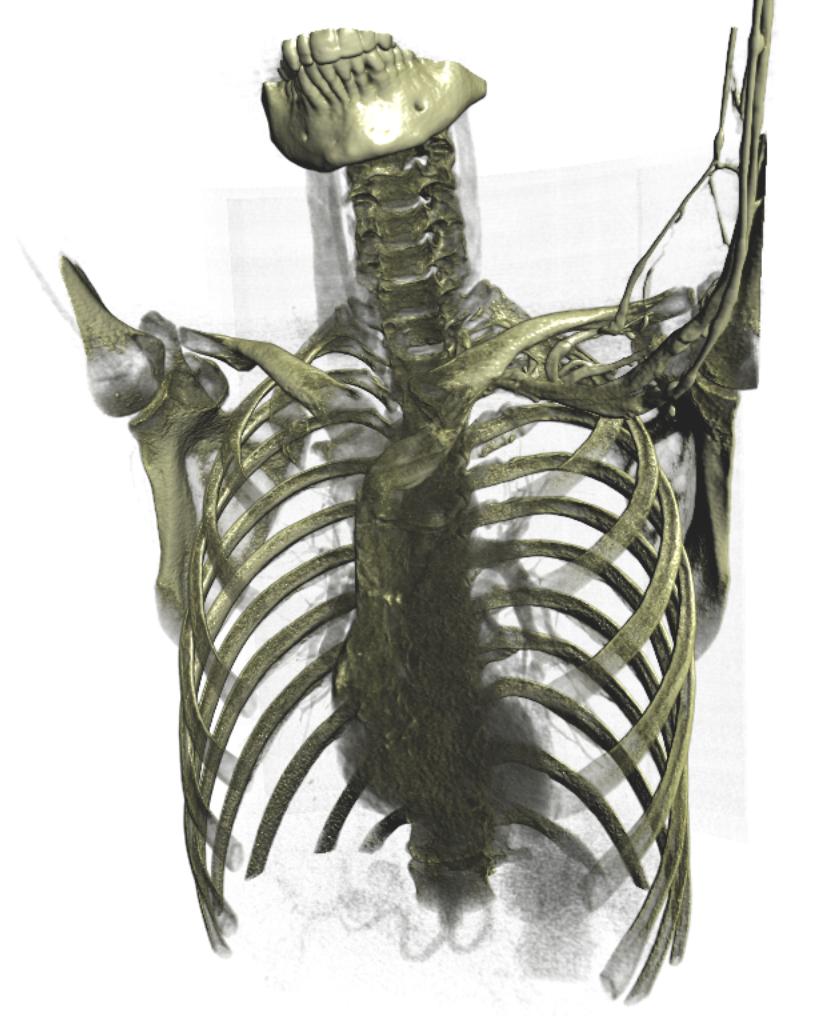
Alpha blending volume renderer with custom TransferFunction
You can create your own look with the alpha blending volume renderer using TransferFunction. TransferFunction accepts a sequence of 5-tuples (intensity, red, green, blue, alpha) and will do linear interpolation for the intensities between.
import fast

importer = fast.ImageFileImporter\
    .create(fast.Config.getTestDataPath() + "/CT/CT-Thorax.mhd")

# TransferFunction accepts a sequence of 5-tuples (intensity, red, green, blue, alpha)
func = fast.TransferFunction([
                150, 0, 0, 0, 0,
                600, 1, 1, 0.5, 0.1,
                1000, 1, 1, 0.8, 1
])
renderer = fast.AlphaBlendingVolumeRenderer.create(func)\
            .connect(importer)

fast.SimpleWindow3D.create()\
    .connect(renderer)\
    .run()
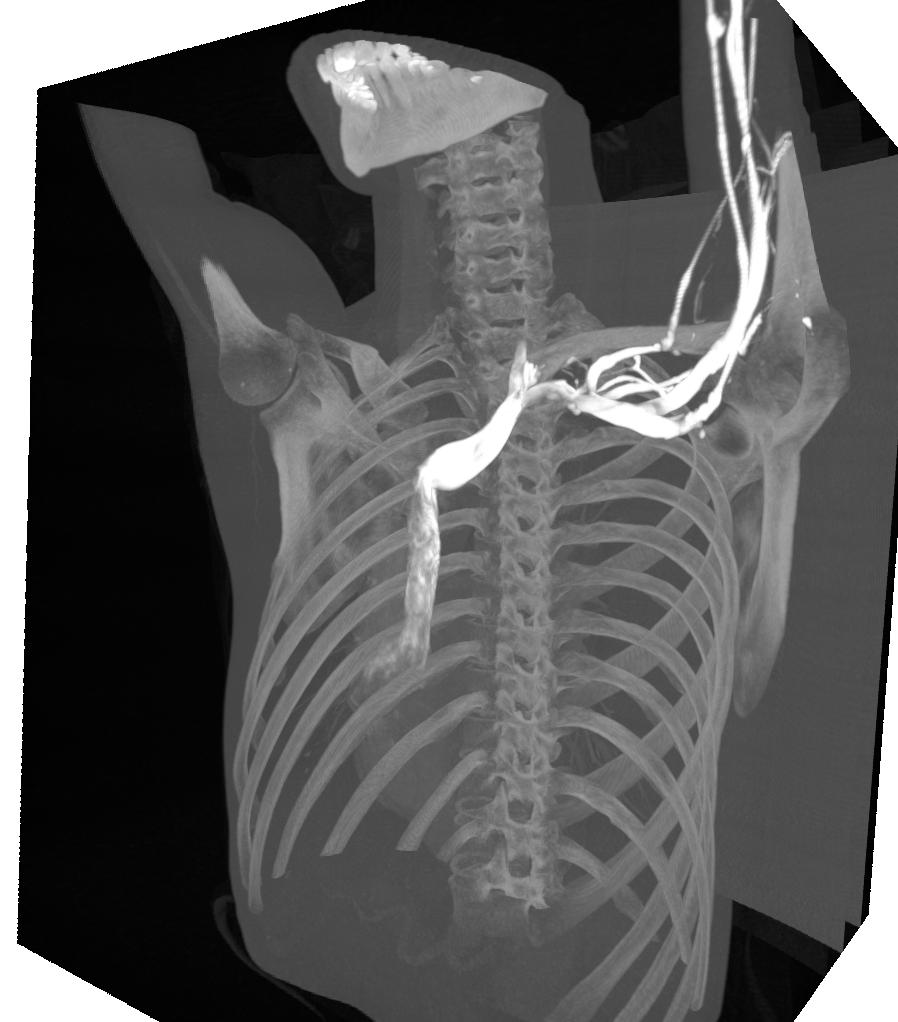
Maximum intensity projection (MIP)
The MaximumIntensityProjection volume renderer simply takes the maximum value of each ray passing through the volume to create a volume rendered image.
import fast

importer = fast.ImageFileImporter\
    .create(fast.Config.getTestDataPath() + "/CT/CT-Thorax.mhd")

renderer = fast.MaximumIntensityProjection.create()\
            .connect(importer)

fast.SimpleWindow3D.create()\
    .connect(renderer)\
    .run()
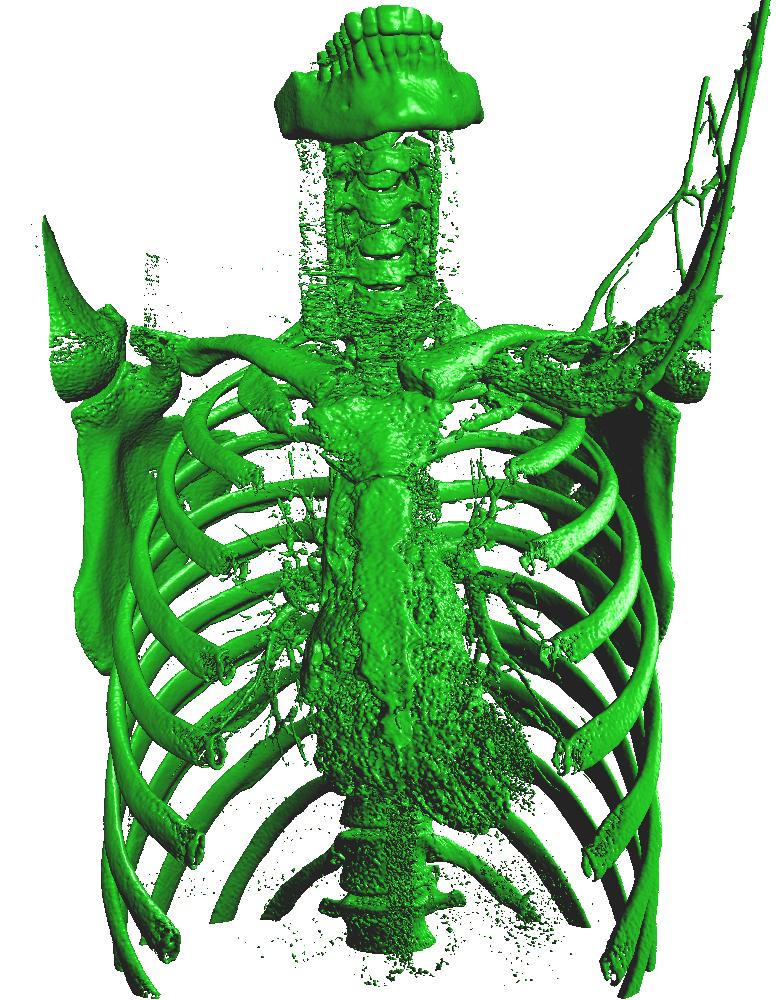
Threshold volume rendering
The ThresholdVolumeRenderer stops the ray casting when it hits a value above a certain threshold. Thus this is similar to what you can do with the SurfaceExtraction and TriangleRenderer.
import fast

importer = fast.ImageFileImporter\
    .create(fast.Config.getTestDataPath() + "/CT/CT-Thorax.mhd")

renderer = fast.ThresholdVolumeRenderer.create(threshold=300)\
            .connect(importer)

fast.SimpleWindow3D.create()\
    .connect(renderer)\
    .run()
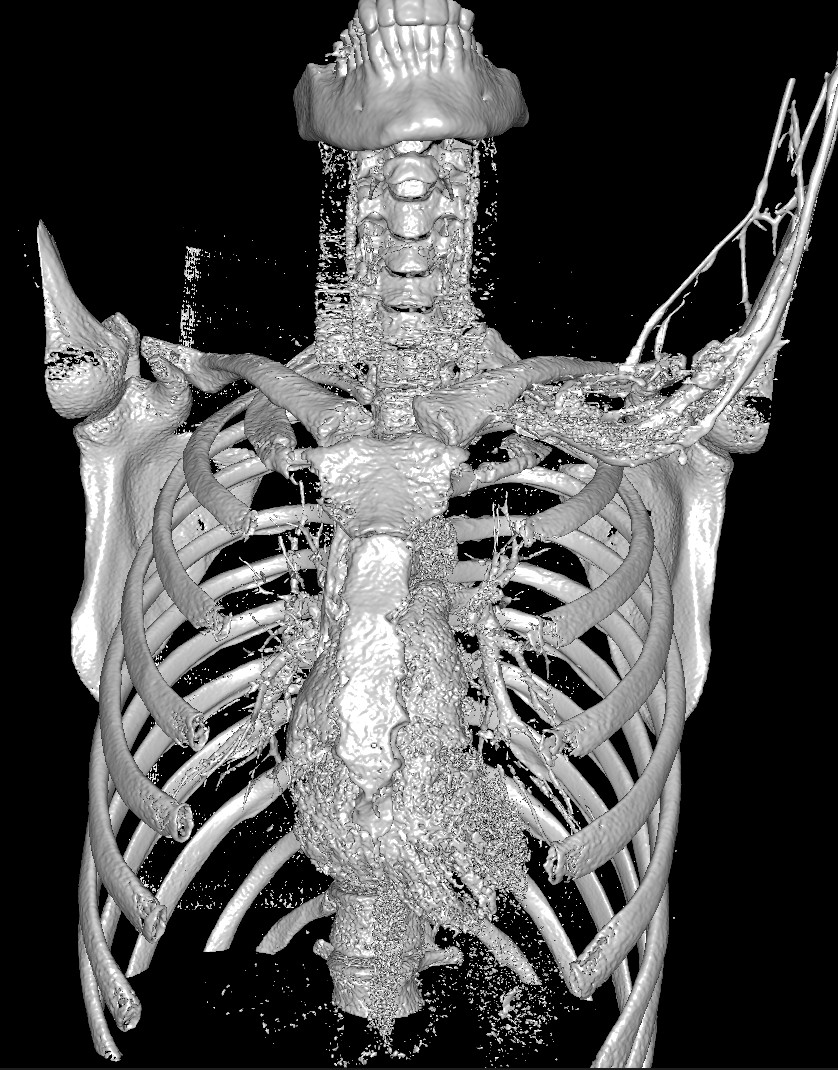
Surface extraction of a CT image
SurfaceExtraction can be used to extract a triangle mesh from a volume using the marching cubes algorithm on the GPU. The triangle mesh can then be rendered using the TriangleRenderer.
import fast

importer = fast.ImageFileImporter\
    .create(fast.Config.getTestDataPath() + "/CT/CT-Thorax.mhd")

surface = fast.SurfaceExtraction.create(300)\
    .connect(importer)

renderer = fast.TriangleRenderer.create(color=fast.Color.White())\
    .connect(surface)

fast.SimpleWindow3D.create(bgcolor=fast.Color.Black())\
    .connect(renderer)\
    .run()
Slice-wise processing
If you need to repeat some processing for each slice, you do so using the PatchGenerator. You can then stitch the results back to a 3D volume using the PatchStitcher.
import fast

importer = fast.ImageFileImporter\
    .create(fast.Config.getTestDataPath() + "/CT/CT-Thorax.mhd")

# This specific CT image has slices size of 512, 512
slices = fast.PatchGenerator.create(512, 512, 1)\
    .connect(importer)

segment = fast.BinaryThresholding.create(300)\
    .connect(slices)

stitch = fast.PatchStitcher.create()\
    .connect(segment)

renderer = fast.ThresholdVolumeRenderer.create()\
    .connect(stitch)

fast.SimpleWindow3D.create()\
    .connect(renderer)\
    .run()
Patch/slab-wise processing
If you need to repeat some processing for a sub-volume/patch/slab you can do so also using the PatchGenerator. You can then stitch the results back using the PatchStitcher.
import fast

importer = fast.ImageFileImporter\
    .create(fast.Config.getTestDataPath() + "/CT/CT-Thorax.mhd")

# Extract patches of size 256x256x8
patches = fast.PatchGenerator.create(256, 256, 8)\
    .connect(importer)

segment = fast.BinaryThresholding.create(300)\
    .connect(patches)

# Stitch the results back together to form a 3D volume
stitch = fast.PatchStitcher.create()\
    .connect(segment)

renderer = fast.ThresholdVolumeRenderer.create()\
    .connect(stitch)

fast.SimpleWindow3D.create()\
    .connect(renderer)\
    .run()
Volumetric resizing and resampling
You can use ImageResizer to resize a volume to a specific size. If you want to resize a volume so that it has a specific voxel spacing you do that using the ImageResampler. These methods run on the GPU and uses tri-linear interpolation by default.
import fast

importer = fast.ImageFileImporter\
    .create(fast.Config.getTestDataPath() + "/CT/CT-Thorax.mhd")

# Resample volume to have a isotropic voxel spacing of 2.5 mm
resample = fast.ImageResampler.create(2.5, 2.5, 2.5)\
    .connect(importer)

fast.SlicerWindow.create()\
    .connectImage(resample)\
    .run()
import fast

importer = fast.ImageFileImporter\
    .create(fast.Config.getTestDataPath() + "/CT/CT-Thorax.mhd")

# Resize the volume to 256x256x256
resize = fast.ImageResizer.create(256, 256, 256)\
    .connect(importer)

fast.SlicerWindow.create()\
    .connectImage(resize)\
    .run()
Brain segmentation of MRI using a neural network
In this example we will download an MRI brain scan and a brain segmentation network created by David Bouget (https:/
import fast

# Download MRI brain scan and segmentation model
model = fast.DataHub().download('brain-mri-segmentation-model')
mri = fast.DataHub().download('brain-mri-t1')

# Setup data importer
importer = fast.ImageFileImporter\
    .create(mri.paths[0] + '/UPENN-GBM-00003_11_T1_unstripped.nii.gz')

# Flip the volume
flip = fast.ImageFlipper.create(flipHorizontal=False, flipVertical=False, flipDepth=True)\
    .connect(importer)

# Resample to isotropic voxel spacing of 1 mm
resample = fast.ImageResampler.create(1.0, 1.0, 1.0)\
    .connect(flip)

# Clip intensities to be between 0 and 2000
clip = fast.IntensityClipping.create(0, 2000)\
    .connect(flip)

# Normalize intensities to have zero mean and unit variance
zeromean = fast.ZeroMeanUnitVariance.create()\
    .connect(clip)

# Load and apply segmentation model
segmentation = fast.SegmentationNetwork.create(model.paths[0] + '/model.onnx',
        outputNodes=[fast.NeuralNetworkNode('conv3d_36')])\
    .connect(zeromean)
segmentation.setResizeBackToOriginalSize(True)

# Setup visualization and run
fast.SlicerWindow.create()\
    .connectImage(resample)\
    .connectSegmentation(segmentation, opacity=0.25, borderOpacity=0.75)\
    .run()
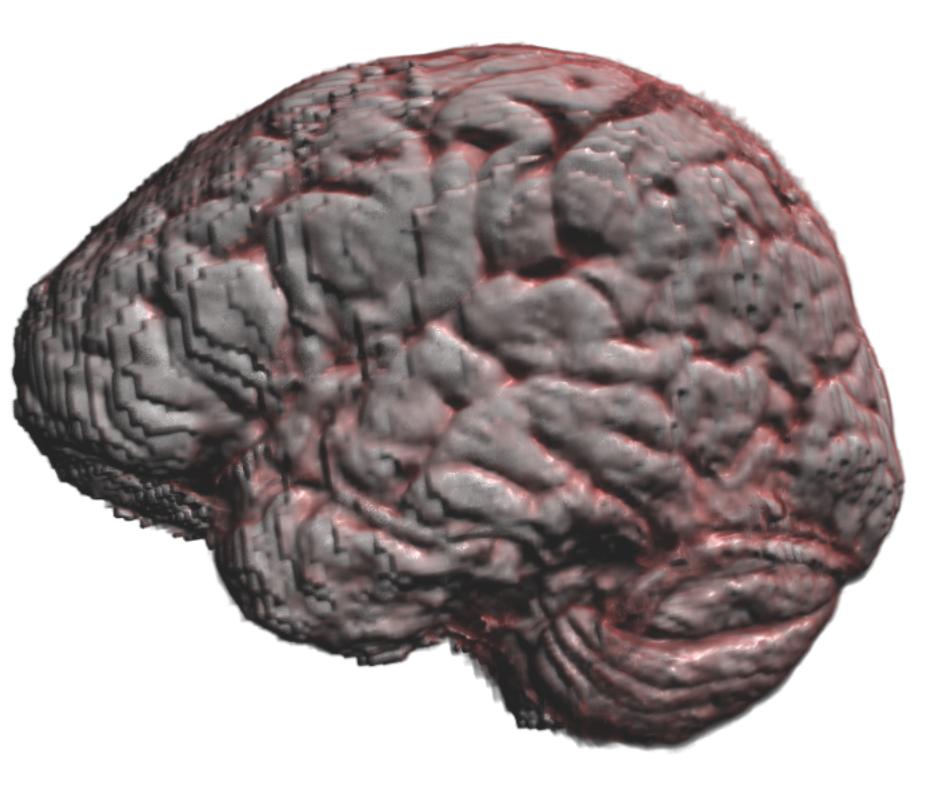
Skull stripping of MRI brain using a neural network
In this example we will download an MRI brain scan and a brain segmentation network created by David Bouget (https:/
The brain segmentation is multiplied with the original image to effectively do skull stripping. Finally, alpha blending volume rendering is used to display the skull stripped MRI volume.
import fast

# Download MRI brain scan and segmentation model
model = fast.DataHub().download('brain-mri-segmentation-model')
mri = fast.DataHub().download('brain-mri-t1')

# Setup data importer
importer = fast.ImageFileImporter\
    .create(mri.paths[0] + '/UPENN-GBM-00003_11_T1_unstripped.nii.gz')

# Flip the volume
flip = fast.ImageFlipper.create(flipHorizontal=False, flipVertical=False, flipDepth=True)\
    .connect(importer)

# Resample to isotropic voxel spacing of 1 mm
resample = fast.ImageResampler.create(1.0, 1.0, 1.0)\
    .connect(flip)

# Clip intensities to be between 0 and 2000
clip = fast.IntensityClipping.create(0, 2000)\
    .connect(flip)

# Normalize intensities to have zero mean and unit variance
zeromean = fast.ZeroMeanUnitVariance.create()\
    .connect(clip)

# Load and apply segmentation model
segmentation = fast.SegmentationNetwork.create(model.paths[0] + '/model.onnx',
        outputNodes=[fast.NeuralNetworkNode('conv3d_36')])\
    .connect(zeromean)
segmentation.setResizeBackToOriginalSize(True)

# Multiply segmentation with original image to skull strip
skullStrip = fast.ImageMultiply.create()\
    .connect(0, clip)\
    .connect(1, segmentation)

# Use alpha blending volume renderer and custom transfer function to
# display the skull stripped MRI data
transferFunction = fast.TransferFunction([
    100, 0, 0, 0, 0,
    200, 1, 0.25, 0.25, 0.1,
    250, 1, 1, 1, 0.5,
    ])
renderer = fast.AlphaBlendingVolumeRenderer.create(transferFunction)\
    .connect(skullStrip)

# Setup visualization and run
fast.SimpleWindow3D.create()\
    .connect(renderer)\
    .run()
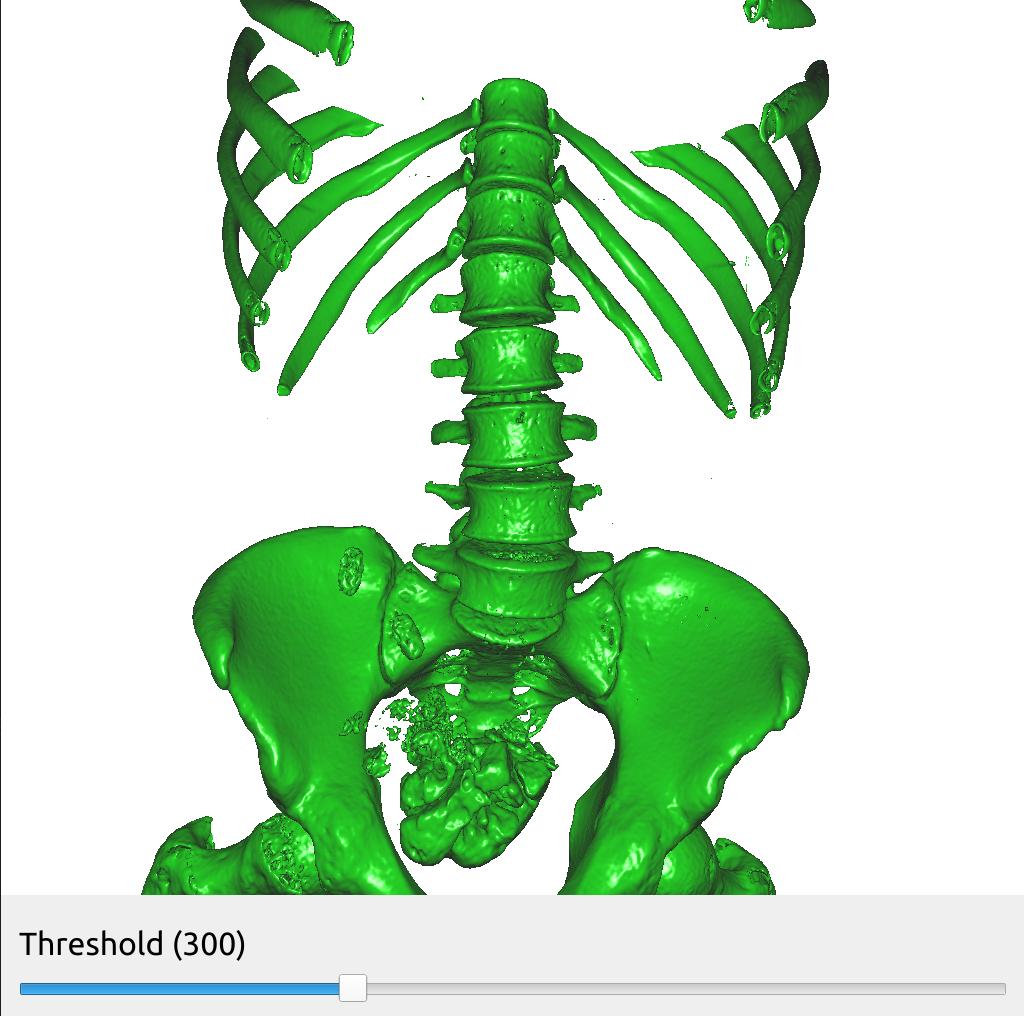
Changing pipeline parameters using a simple GUI
FAST provides some simple GUI widgets which can be connected to process objects and added to the window. This enables you to change parameters in the GUI and see the effects in real-time with just one line of code. Here is an example were we added a SliderWidget to control the threshold of the SurfaceExtraction process object. The SliderWidget calls the SliderCallback everytime its value is changed. Remember to connect the GUI widget to the window object using the connect method.
import fast

importer = fast.ImageFileImporter\
    .create(fast.Config.getTestDataPath() + "/CT/CT-Abdomen.mhd")

surface = fast.SurfaceExtraction.create(300)\
    .connect(importer)

renderer = fast.TriangleRenderer.create()\
    .connect(surface)

# Create a slider widget to control the surface extraction threshold
# The arguments to SliderWidget are: name, current value, min value, max value, step size, callback
thresholdSlider = fast.SliderWidget('Threshold', 300, 200, 500, 25, fast.SliderCallback(lambda x: surface.setThreshold(x)))

# Create window and connect renderers and widgets
fast.SimpleWindow3D.create()\
    .connect(renderer)\
    .connect(thresholdSlider)\
    .run()
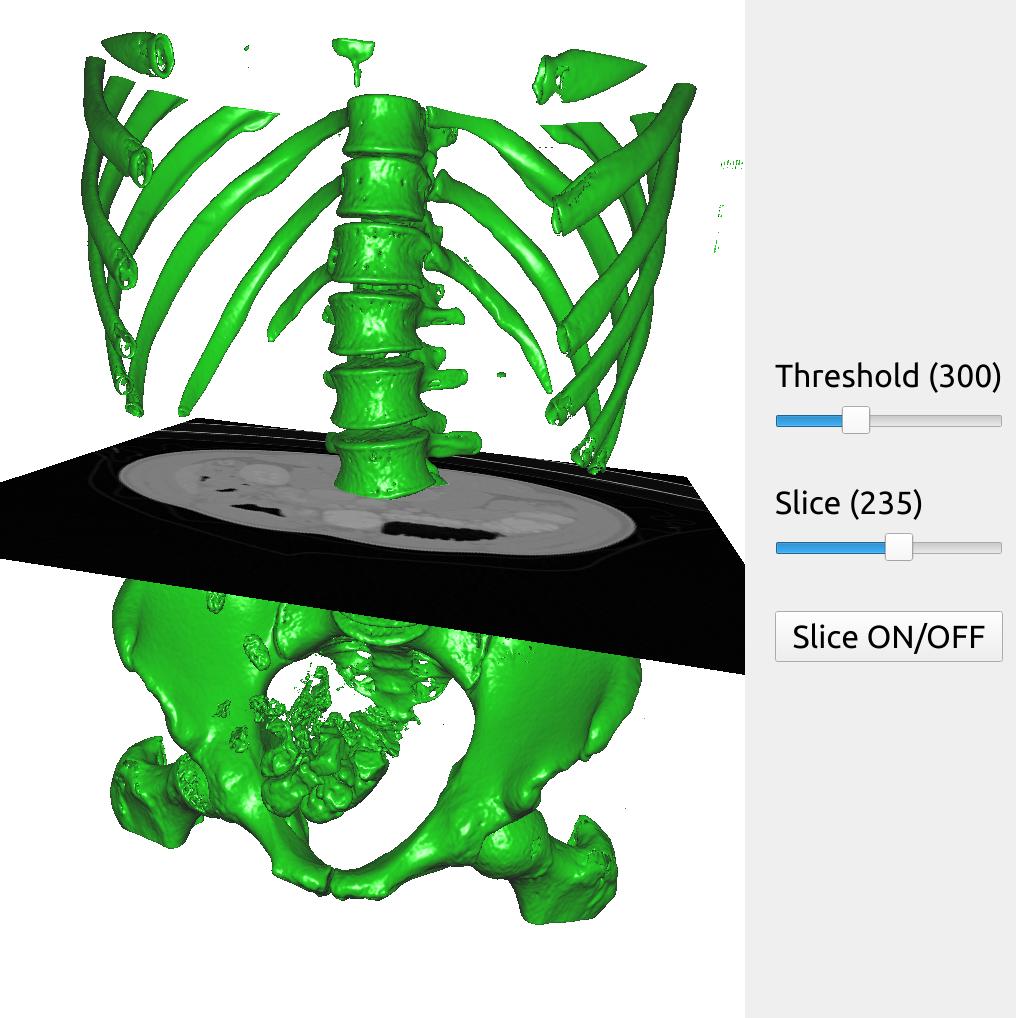
Here is a bigger example with two different SliderWidget and a ButtonWidget to control the threshold, a slice plane and turning on and off the slice plane.
import fast

importer = fast.ImageFileImporter\
    .create(fast.Config.getTestDataPath() + "/CT/CT-Abdomen.mhd")

surface = fast.SurfaceExtraction.create(300)\
    .connect(importer)

renderer = fast.TriangleRenderer.create()\
    .connect(surface)

slicer = fast.ImageSlicer.create(fast.PLANE_Z, 200)\
    .connect(importer)

sliceRenderer = fast.ImageRenderer.create()\
    .connect(slicer)

# Create two slider and a button widget
thresholdSlider = fast.SliderWidget('Threshold', 300, 200, 500, 25, fast.SliderCallback(lambda x: surface.setThreshold(x)))
sliceSlider = fast.SliderWidget('Slice', 200, 0, 426, 1, fast.SliderCallback(lambda x: slicer.setOrthogonalSlicePlane(fast.PLANE_Z, int(x))))
disableButton = fast.ButtonWidget('Slice ON/OFF', True, fast.ButtonCallback(lambda x: sliceRenderer.setDisabled(x)))

# Create window and connect renderers and widgets
fast.SimpleWindow3D.create()\
    .connect([renderer, sliceRenderer])\
    .connect([thresholdSlider, sliceSlider, disableButton], fast.WidgetPosition_RIGHT)\
    .run()
Next steps
- See more Python Tutorials.
- Check out some Python Examples.
- Review Concepts & Glossary used in FAST.