Python Introduction Tutorial
Contents
This is an introduction tutorial for FAST in Python. To follow this Python FAST tutorial, please install FAST for Python first, and verify that your installation is working.
Download test data
To download the ~2 GB FAST test dataset, simply start your Python interpreter and execute the following Python code:
import fast
fast.downloadTestDataIfNotExists()
Import image data
We will start by importing an ultrasound image from disk stored in the metaimage (mhd) format:
import fast
importer = fast.ImageFileImporter.create(fast.Config.getTestDataPath() + 'US/Heart/ApicalFourChamber/US-2D_0.mhd')
This code will create an ImageFileImporter process object and set the filename of the ultrasound image to load. This importer can load images stored in many different formats such as MHD, Dicom, JPEG, PNG, BMP. Config::
image = importer.runAndGetOutputData()
print("An image was imported with size: ", image.getWidth(), image.getHeight())
Display the image data
To display the image data, we need two things: a Window and a Renderer. For this example, we will use the ImageRenderer which is used to display images, and the SimpleWindow in 2D mode. The renderer is connected to the importer using the connect method:
renderer = fast.ImageRenderer.create().connect(importer)
This will form an execution pipeline, so that executing the renderer will trigger execute on the importer as well.
Our entire example should now look like this:
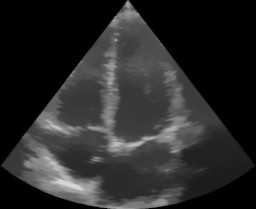
import fast
importer = fast.ImageFileImporter.create(fast.Config.getTestDataPath() + 'US/Heart/ApicalFourChamber/US-2D_0.mhd')

# Set up a renderer and connect it to the importer
renderer = fast.ImageRenderer.create().connect(importer)

# Create a window, add the renderer and start the computation/rendering loop.
window = fast.SimpleWindow2D.create().connect(renderer)
window.run()
You should now see this image:

Add an image processing step
We will now add an image processing step to our pipeline. For this, we will use the NonLocalMeans filter which is excellent at de-noising ultrasound images.
import fast
importer = fast.ImageFileImporter.create(fast.Config.getTestDataPath() + 'US/Heart/ApicalFourChamber/US-2D_0.mhd')

# Set up the NonLocalMeans processing step and connect it to the importer
nlm = fast.NonLocalMeans.create().connect(importer)

# Set up a renderer and connect it to the NLM filter
renderer = fast.ImageRenderer.create().connect(nlm)

# Create a window, add the renderer and start the computation/rendering loop.
fast.SimpleWindow2D.create()\
    .connect(renderer)\
    .run()
The results should look like this:
Dual view window
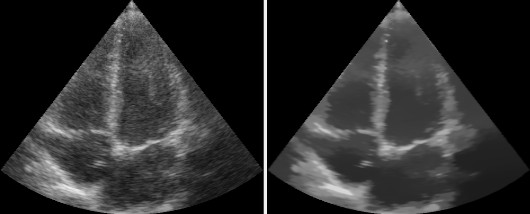
Now, let's say we want to display the input image and the filtered image side-by-side. The SimpleWindow used above only has a single View, to show two images side-by-side we will need two View objects and therefore we will use the DualViewWindow instead. We also need an additional ImageRenderer which is connected to the ImageFileImporter. Putting this all together, it should look like this:
import fast
importer = fast.ImageFileImporter.create(fast.Config.getTestDataPath() + 'US/Heart/ApicalFourChamber/US-2D_0.mhd')

# Set up the NonLocalMeans processing step and connect it to the importer
nlm = fast.NonLocalMeans.create().connect(importer)

# Set a renderer and connect it to importer
renderer = fast.ImageRenderer.create().connect(importer)

# Set a renderer and connect it to the NonLocalMeans filter
filterRenderer = fast.ImageRenderer.create().connect(nlm)

# Create a dual view window, add the renderers and start the computation/rendering loop.
window = fast.DualViewWindow2D.create()\
    .connectLeft(renderer)\
    .connectRight(filterRenderer)
window.run()
The result should look like this:
Data streaming
So far we have only processed a single image, but now we are going to process a stream of images. FAST can stream images from disk, videos, cameras and even from ultrasound scanners. First, we are going to try streaming from disk. To do this, simply replace the ImageFileImporter with an ImageFileStreamer in the previous code example:
importer = fast.ImageFileStreamer.create(fast.Config.getTestDataPath() + '/US/Heart/ApicalFourChamber/US-2D_#.mhd', True)
Compile and run the application, and you should now see an entire ultrasound recording being played back to you on screen.
If you want to iterate through a stream of data manually, you this with a simply loop as follows:
import fast
streamer = fast.ImageFileStreamer.create(fast.Config.getTestDataPath() + '/US/Heart/ApicalFourChamber/US-2D_#.mhd')

nlm = fast.NonLocalMeans.create().connect(streamer)

# Iterate through all frames in data stream
frameNr = 0
for image in fast.DataStream(nlm):
    print('Received image frame', frameNr, 'with size', image.getWidth(), image.getHeight())
    frameNr += 1
Integration with other Python libraries
Images in FAST implements the Python array interface, and may thus be passed onto other Python libraries which can read this array interface, e.g. NumPy and Matplotlib.
Convert FAST image to NumPy ndarray
import fast
import numpy as np

# Import an image to FAST
importer = fast.ImageFileImporter.create(fast.Config.getTestDataPath() + 'US/Heart/ApicalFourChamber/US-2D_0.mhd')
fast_image = importer.runAndGetOutputData()

# Convert the FAST image to a NumPy ndarray
numpy_image = np.asarray(fast_image)
Create FAST image from a NumPy ndarray
import fast
import numpy as np
from PIL import Image

image = Image.open(fast.Config.getDocumentationPath() + 'images/FAST_logo_square.png')
numpy_image = np.asarray(image)

# Create FAST image from the NumPy ndarray
fast_image = fast.Image.createFromArray(numpy_image)
Visualize FAST image with Matplotlib
import fast
import matplotlib.pyplot as plt
import numpy as np

importer = fast.ImageFileImporter.create(fast.Config.getTestDataPath() + 'US/Heart/ApicalFourChamber/US-2D_0.mhd')
fast_image = importer.runAndGetOutputData()
numpy_image = np.asarray(fast_image)

plt.imshow(numpy_image[..., 0], cmap='gray')
plt.show()
Create FAST image from an OpenCV image
Like with numpy, and OpenCV image can easily be converted to a FAST image using the createFromArray method:
import fast
import cv2

# Load image from disk with OpenCV
cv_image = cv2.imread(fast.Config.getTestDataPath() + "US/US-2D.jpg")

# Convert OpenCV image to FAST
fast_image = fast.Image.createFromArray(cv_image)

# Visualize with FAST
renderer = fast.ImageRenderer.create().connect(fast_image)
fast.SimpleWindow2D.create().connect(renderer).run()
Create OpenCV image from a FAST image
An OpenCV image in Python is basically just a NumPy array, therefore you can use the np.asarray function to convert a FAST image to an OpenCV image.
import fast
import cv2
import numpy as np

# Import image with FAST
importer = fast.ImageFileImporter.create(fast.Config.getTestDataPath() + "US/US-2D.jpg")
fast_image = importer.runAndGetOutputData()

# Convert FAST image to a NumPy array/OpenCV image
cv_image = np.asarray(fast_image)

# Visualize the image with OpenCV
cv2.imshow('FAST image!', cv_image)
cv2.waitKey(1000*3) # Display for 3 seconds
cv2.destroyAllWindows()
Use Python code (NumPy, scikit-image, OpenCV ++) in a FAST pipeline
You can inject any Python code into a FAST processing pipeline by extending the PythonProcessObject class. Here is a complete example on how to do this:
import fast
import numpy as np

# Check if OpenCV is available
use_opencv = False
try:
    import cv2
    use_opencv = True
except ImportError:
    pass


""" Make a python process object which simply inverts image with numpy """
class Inverter(fast.PythonProcessObject):
    def __init__(self):
        super().__init__()
        self.createInputPort(0)
        self.createOutputPort(0)

    def execute(self):
        # Get image and invert it with numpy
        image = self.getInputData()
        np_image = np.asarray(image)
        np_image = 255 - np_image # invert

        # If OpenCV is available, add some text using OpenCV
        if use_opencv:
            cv2.putText(np_image, 'OpenCV!', (40, 20), cv2.FONT_HERSHEY_SIMPLEX, 1, (0,0,0), 2)

        # Create new fast image and add as output
        new_output_image = fast.Image.createFromArray(np_image)
        new_output_image.setSpacing(image.getSpacing())
        self.addOutputData(0, new_output_image)


# Set up pipeline as normal
importer = fast.ImageFileStreamer.create(
    fast.Config.getTestDataPath() + 'US/Heart/ApicalFourChamber/US-2D_#.mhd',
    loop=True,
    framerate=40,
)

inverter = Inverter.create().connect(importer)

renderer = fast.ImageRenderer.create().connect(inverter)

window = fast.SimpleWindow2D.create().connect(renderer).run()
Exporting data
Next steps
You have now finished the Python introduction tutorial to FAST.
- See more Python Tutorials.
- Check out some Python Examples.
- Review Concepts & Glossary used in FAST.