C++ Introduction Tutorial
Contents
This is an introduction tutorial for FAST in C++.
Set up a CMake project
Before we can start coding in C++ with FAST we need to set up a CMake project. This will enable you to build a standalone executable using FAST.
- First install FAST on your machine.
Then you need to install some tools (Git, CMake and a C++ compiler) to build your FAST application:
Windows
Download and install these tools: Git, CMake and Visual Studio Community.Ubuntu Linux
sudo apt install git cmake g++
Clone the FAST example project repository:
git clone https://github.com/smistad/FAST-example-project.git
cd FAST-example-project
Setup your build environment using CMake:
Windows (Visual Studio)
Modify generator -G string to match your Visual studio version. This command will create a visual studio solution in your build folder.mkdir build cd build cmake .. -DFAST_DIR="C:/Program Files/FAST/fast/cmake/" -G "Visual Studio 16 2019" -A x64
Linux
mkdir build
cd build
cmake .. -DFAST_DIR=/opt/fast/cmake/
Build the application:
cmake --build . --config Release --target fastExample
Run the application:
Windows
cd Release
fastExample.exe
Linux
./fastExample
Now you should hopefully see this:
Download the test data
To download the 2~GB FAST test dataset, simply run the downloadTestData executable found in your FAST installation directory. With default install locations these are:
Linux: /opt/fast/bin/downloadTestData
Windows: C:/Program Files/FAST/fast/bin/downloadTestData.exe
Importing data
Now we are ready to start coding. Open the main.cpp file in an editor of your choice. Start by removing all the code in the main() function to start from scratch. Then add the following code to load an ultrasound image:
auto importer = ImageFileImporter::create(Config::getTestDataPath() + "US/Heart/ApicalFourChamber/US-2D_0.mhd");
This code will create an ImageFileImporter process object and set the filename of the ultrasound image to load. Config::
auto image = importer->runAndGetOutputData<Image>();
std::cout << "An image was imported with size: " << image->getSize() << std::endl;
Use the command cmake --build . --config Release --target fastExample from before to rebuild the application.
Display the data
To display the image data, we need two things: a Window and a Renderer. For this example, we will use the ImageRenderer which is used to display images, and the SimpleWindow2D. The renderer is connected to the importer using the connect method:
auto renderer = ImageRenderer::create()->connect(importer);
This will form an execution pipeline, so that executing the renderer will trigger execute on the importer as well.
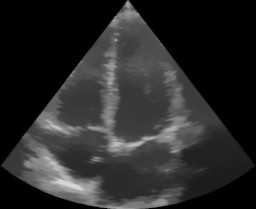
Our entire example should now look like this:
auto importer = ImageFileImporter::create(Config::getTestDataPath() + "US/Heart/ApicalFourChamber/US-2D_0.mhd");

// Set up a renderer and connect it to the importer
auto renderer = ImageRenderer::create()->connect(importer);

// Create a 2D window, add the renderer and start the computation/rendering loop.
SimpleWindow2D::create()
    ->connect(renderer)
    ->run();
You should now see this image:

Add an image processing step
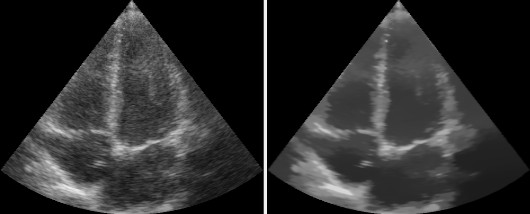
We will now add an image processing step to our pipeline. For this, we will use the NonLocalMeans filter which is excellent at de-noising ultrasound images.
auto importer = ImageFileImporter::create(Config::getTestDataPath() + "US/Heart/ApicalFourChamber/US-2D_0.mhd");

// Set up the NonLocalMeans processing step and connect it to the importer
auto filter = NonLocalMeans::create()->connect(importer);

// Set up the renderer and connect it to the NonLocalMeans filter
auto renderer = ImageRenderer::create()->connect(filter);

// Create a window, add the renderer and start the computation/rendering loop.
SimpleWindow2D::create()
    ->connect(renderer)
    ->run();
The results should look like this:
Dual view window
Now, let's say we want to display the input image and the filtered image side-by-side. The SimpleWindow used above only has a single View, to show two images side-by-side we will need two View objects and therefore we will use the DualViewWindow2D instead. We also need an additional ImageRenderer which is connected to the ImageFileImporter. Putting this all together, it should look like this:
auto importer = ImageFileImporter::create(Config::getTestDataPath() + "US/Heart/ApicalFourChamber/US-2D_0.mhd");

// Set up the NonLocalMeans processing step and connect it to the importer
auto filter = NonLocalMeans::create()->connect(importer);

// Set a renderer and connect it to importer
auto renderer = ImageRenderer::create()->connect(importer);

// Set a renderer and connect it to the NonLocalMeans filter
auto filterRenderer = ImageRenderer::create()->connect(filter);

// Create a dual view window, add the renderers and start the computation/rendering loop.
DualViewWindow2D::create()
    ->connectLeft(renderer)
    ->connectRight(filterRenderer)
    ->run();
The result should look like this:
Data streaming
So far we have only processed a single image, but now we are going to process a stream of images. FAST can stream images from disk, videos, cameras and even from ultrasound scanners. First, we are going to try streaming from disk. To do this, simply replace the ImageFileImporter with an ImageFileStreamer in the previous code example:
auto importer = ImageFileStreamer::create(Config::getTestDataPath() + "/US/Heart/ApicalFourChamber/US-2D_#.mhd", true);
Compile and run the application, and you should now see an entire ultrasound recording being played back to you on screen.
If you want to iterate through a stream of data manually, you this with a simply loop as follows:
auto streamer = ImageFileStreamer::create(Config::getTestDataPath() + "/US/Heart/ApicalFourChamber/US-2D_#.mhd");

auto filter = NonLocalMeans::create()->connect(streamer);
auto dataStream = DataStream(filter);

// Iterate through all frames in data stream
int frameNr = 0;
while(!dataStream.isDone()) {
    auto image = dataStream.getNextFrame<Image>(); // Get next frame in data stream of type Image
    std::cout << "Received image frame " << frameNr << " with size " << image->getSize() << std::endl;
    ++frameNr;
}
Access pixel data
To access pixel data on the host CPU we have to request access to it through an ImageAccess object. This is done by calling Image::
auto importer = ImageFileImporter::create(Config::getTestDataPath() + "US/Heart/ApicalFourChamber/US-2D_0.mhd");

// Run importer and get access to pixel data on host with READ and WRITE access.
auto image = importer->runAndGetOutputData<Image>();
auto access = image->getImageAccess(ACCESS_READ_WRITE);

// Retrieve pixel value at x = 10, y = 23
float intensity = access->getScalar(Vector2i(10, 23));

// Retrieve pixel value at 1D position 1337
float intensity2 = access->getScalar(1337);

// Write pixel value 42 at x = 10, y = 23
access->setScalar(Vector2i(10, 23), 42);
If this image was a 3D image, you could simply use the Vector3i to index the volume instead.
Faster pixel access
The code above performs out-of-bounds check and data type conversion between the image true data type (in this case uchar) and float. This is slow, and not a good idea in a loop. Therefore there are faster versions of these function that doesn't before these kind of operations, but it requires you to know that you are within the bounds of the image (otherwise you will get a seg fault crash), and to know the data type of your image.
// Access pixel data without type conversion and out of bounds check using the Fast methods:

// Retrieve pixel value at x = 10, y = 23
uchar intensity = access->getScalarFast<uchar>(Vector2i(10, 23));

// Write pixel value 42 at x = 10, y = 23
access->setScalarFast(Vector2i(10, 23), 42);
Multi-channel images
If you have a multi-channel image, every pixel will have a vector, and you can use the same methods as above, by just replacing the word scalar with vector, see Image::getVector.
Exporting data
To export an image, we can use the ImageFileExporter process object. The following example simply imports a metaimage (.mhd) and exports it to disk as a jpeg image. There are many other exporters available for different kinds of data and formats, see the exporter API module page for an overview.
auto importer = ImageFileImporter::create(Config::getTestDataPath() + "US/Heart/ApicalFourChamber/US-2D_0.mhd");

auto exporter = ImageFileExporter::create("exported_image.jpg")
    ->connect(importer);
exporter->run();
Next steps
You have now finished the C++ introduction tutorial to FAST.
- See more C++ Tutorials.
- Check out some C++ Examples.
- Review Concepts & Glossary used in FAST.